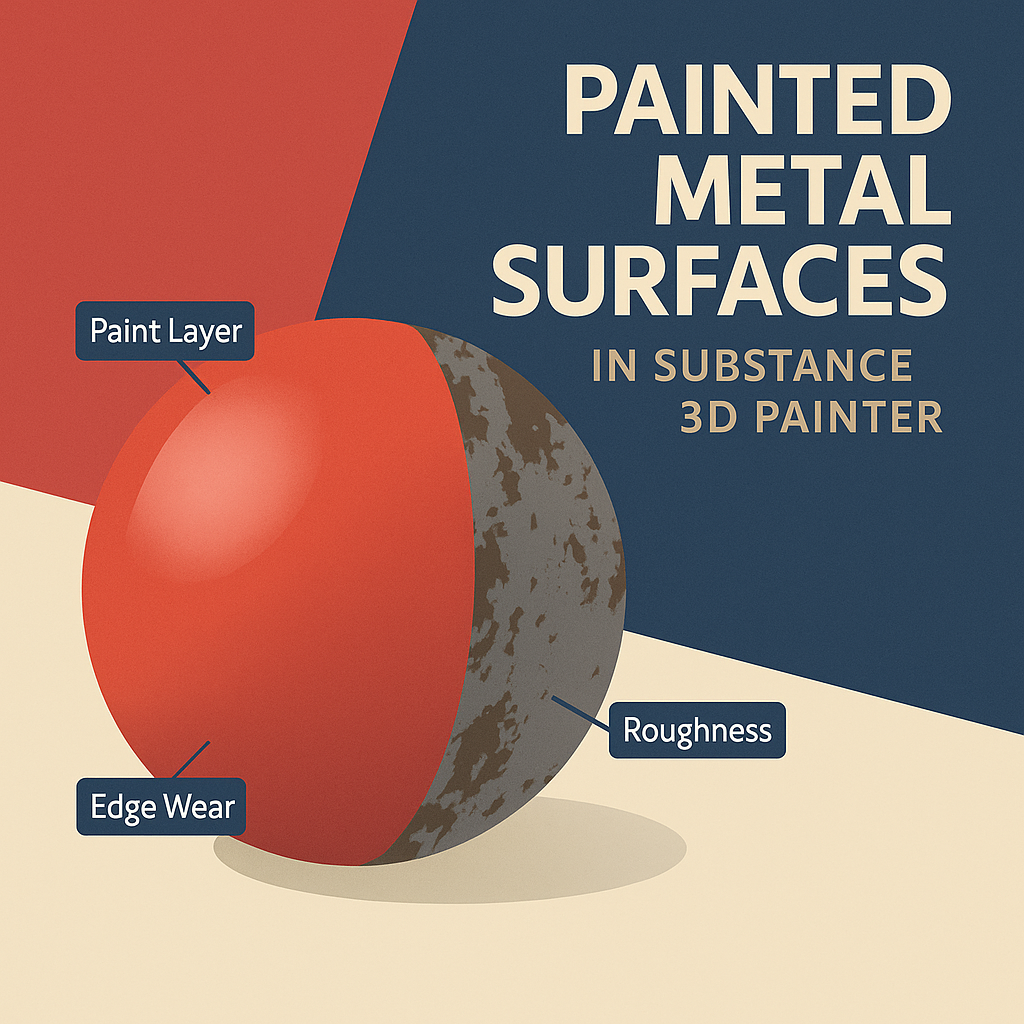
Painted metal is everywhere — from cars and appliances to machinery and signage. But to make it believable in 3D, it needs more than just a coat of color. Realistic painted metal combines smooth finishes, subtle imperfections, and signs of wear that tell a story.
In Adobe Substance 3D Painter, you can achieve this look using Smart Materials, masks, and roughness variation, all while keeping your workflow non-destructive.
👉 Start your free trial of the Adobe Substance 3D Collection to follow along and learn how to create realistic painted metal effects step by step.
🧱 Step 1: Start with a Clean Metal Base
- Open your 3D model in Substance 3D Painter.
- Choose a Smart Material such as Steel Painted or Iron Pure.
- If starting from scratch, create a Fill Layer with:
- Base Color: Medium gray
- Metallic: 1
- Roughness: 0.3–0.5
- This gives you the reflective foundation that your paint will sit on.
💡 Tip: The metallic base determines how light interacts with your paint — always start with a true metal underneath.
🎨 Step 2: Add the Painted Layer
- Create a new Fill Layer on top of your metal.
- Enable Base Color and Roughness, disable Metallic.
- Pick your desired paint color — red, blue, or white are great for testing reflections.
- Adjust Roughness between 0.2 and 0.6 for your desired gloss level.
🎯 Pro Tip: Lower roughness = glossy automotive paint. Higher roughness = matte industrial finish.
⚙️ Step 3: Add Edge Wear and Scratches
To reveal the metal beneath:
- Right-click your painted layer → Add Black Mask.
- Add a Generator → Metal Edge Wear.
- Adjust:
- Wear Level: how much paint is chipped
- Contrast: defines transition softness
- Grunge Amount: adds natural irregularities
- The edges of your model will now show exposed metal.
🧠 Pro Tip: Combine this with a Curvature Map to ensure wear appears on raised areas naturally.
🧩 Step 4: Add Rust and Dust Accumulation (Optional)
- Create a new Fill Layer with a brownish-orange color.
- Add a Black Mask → Add Generator → Dirt.
- Adjust Balance and Grunge Amount until subtle rust appears in recesses.
- Set the layer blending mode to Multiply or Overlay for realistic tinting.
🎨 Optional: Add a Dust Layer above it using a beige tone with low opacity for outdoor assets.
💥 Step 5: Add Micro Imperfections to the Paint
To avoid overly clean surfaces:
- Add a Fill Layer with Roughness enabled only.
- Mask it using a Grunge Fingerprints or Grunge Dust Scratches texture.
- Lower the layer opacity for subtle variation.
💡 Pro Tip: Use Levels to control the strength — imperfections should only appear under light reflections.
🔦 Step 6: Adjust Lighting and Preview the Material
- Go to Display Settings → Environment Map → Studio Warm Light.
- Rotate the environment to highlight surface reflections.
- Enable Tone Mapping → ACES for realistic color response.
🎯 Pro Tip: Zoom in to check reflection behavior — perfect gloss transitions are the secret to photoreal paint.
💾 Step 7: Export the Textures
- Go to File → Export Textures.
- Use the PBR Metallic Roughness preset.
- Export at 4K resolution for high-end renders.
Your painted metal is now ready to use in Blender, Unreal Engine, or Adobe Stager with full physical accuracy.
✅ Conclusion
Realistic painted metal is about the balance between perfection and imperfection. With Adobe Substance 3D Painter, you can layer Smart Masks, roughness variation, and edge wear to create surfaces that feel both manufactured and aged by use.
👉 Try it yourself with a free trial of the Adobe Substance 3D Collection and build your own realistic painted surfaces.
