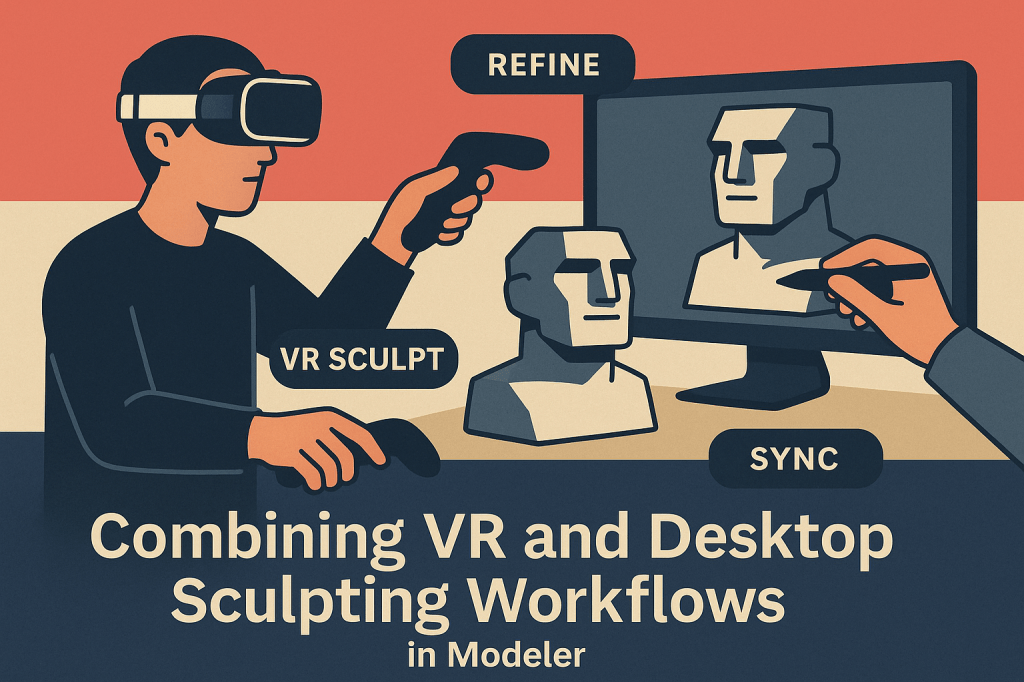
One of the most innovative aspects of Adobe Substance 3D Modeler is its dual workflow system — letting artists sculpt both in Virtual Reality (VR) and on the desktop with perfect synchronization.
This hybrid approach merges the best of both worlds: the immersion and spatial awareness of VR sculpting with the precision and refinement of desktop tools. Whether you’re shaping organic characters or mechanical props, switching seamlessly between modes allows for a fluid, efficient, and intuitive 3D modeling experience.
👉 You can explore this workflow using the Adobe Substance 3D Collection free trial — which includes Modeler, Painter, Designer, Sampler, and Stager.
🎨 Why Combine VR and Desktop Sculpting?
Each mode in Modeler offers a unique set of advantages:
VR Sculpting Advantages
- Natural hand movement for shaping and proportioning.
- Full 3D spatial perception — see your model’s true depth and volume.
- Perfect for blocking, concepting, and large-scale form exploration.
Desktop Sculpting Advantages
- Precise control for refining details and surface quality.
- Integration with pen tablets for subtle brushwork.
- Easier navigation of panels, layers, and masks for complex projects.
💡 By combining both, you can start freely in VR and finish with desktop precision — just like a digital sculptor moving from clay to carving tools.
🧰 Step 1: Set Up Your Dual Workflow Environment
Before diving into sculpting, ensure your setup is ready for smooth transitions.
- Hardware Requirements:
- VR headset (e.g., Meta Quest, Valve Index, or HTC Vive).
- VR-compatible controllers.
- A pen tablet (like a Wacom) for desktop sculpting.
- Install Adobe Substance 3D Modeler via Creative Cloud.
- Ensure your headset and desktop are connected to the same system.
🎯 Pro Tip: You can launch Modeler directly in VR mode or desktop mode — the same file works across both environments.
🪄 Step 2: Start Sculpting in VR Mode
Begin your creative process in VR to establish major shapes and proportions.
- Launch Modeler in VR mode.
- Use both controllers as digital hands:
- Trigger: Add or remove clay.
- Grip: Rotate and scale the scene.
- Joystick: Navigate around the workspace.
- Use large brush sizes to block forms quickly — like shaping a bust, helmet, or furniture piece.
- Enable Symmetry (press
Xor toggle in the VR panel) for balanced forms.
💡 Workflow Tip: In VR, stand back to see your model in full scale — move physically around it for natural perspective adjustments.*
✏️ Step 3: Save and Switch to Desktop Mode
Once your large shapes are complete, it’s time to refine them on the desktop.
- Save your VR scene (
.smodelfile). - Exit VR and reopen Modeler in Desktop Mode.
- Your entire scene loads exactly as it appeared in VR — including clay layers, tools, and brushes.
🎨 Pro Tip: You can freely alternate between VR and desktop anytime during the process — Modeler saves both input types within the same project file.*
🧱 Step 4: Refine with Desktop Precision
On desktop, focus on tightening edges, refining surfaces, and adding fine details.
- Use the Smooth Tool to polish rough areas.
- Select the Trim Tool for precise hard-surface adjustments.
- Switch to Inflate or Crease Brushes for detailed organic surfaces.
- Use Layer Masks to isolate regions for micro-sculpting.
🎯 Example Workflow:
- Sculpt a car body or prop outline in VR.
- Refine vent grooves, screws, or panel seams in desktop mode.
- Add intricate design motifs or mechanical trims with pen tablet control.
🔄 Step 5: Move Back into VR for Proportion Adjustments
When your refinements start to feel too “flat,” jump back into VR to check proportions and depth in real space.
- Launch VR Mode again and load the same project.
- Step around your model — inspect silhouette and surface balance.
- Use Grab and Clay tools to tweak large forms without losing detail.
💡 Pro Tip: VR perspective helps correct proportion errors that often go unnoticed in orthographic desktop views.
⚙️ Step 6: Combine Boolean and Organic Techniques Across Modes
The real magic happens when you mix both sculpting styles:
- Use Boolean operations (Add/Subtract) in desktop for mechanical precision.
- Return to VR mode to organically blend or reshape those areas.
- Alternate for hybrid models like robots, furniture, or character armor.
🎨 Example: Create a sci-fi helmet:
- VR: Block the main shape and proportions.
- Desktop: Carve vents, connectors, and sharp panel lines.
- VR again: Smooth transitions and add overall polish.
🧩 Step 7: Use Layers to Manage Cross-Mode Changes
Modeler’s layer system ensures you can easily control your sculpt across both environments.
- Keep structural parts on separate layers (e.g., “Body,” “Accessories,” “Details”).
- Toggle visibility in desktop mode for isolated editing.
- Merge or duplicate layers when returning to VR for holistic sculpting.
💡 Workflow Tip: Think of layers as “sculpting checkpoints.” You can always revert to a previous stage or experiment safely between modes.*
🧠 Step 8: Export for Texturing and Rendering
When your dual-mode sculpt feels complete:
- Export Model → choose
.USD,.OBJ, or.FBX. - Import into Substance 3D Painter for detailed material painting.
- Finish in Substance 3D Stager for photorealistic lighting and rendering.
🎯 Pro Example: Sculpt a product concept in VR → refine details in desktop → texture in Painter → render in Stager with HDR lighting and shadows.*
✅ Conclusion
The ability to move effortlessly between VR sculpting and desktop refinement in Adobe Substance 3D Modeler gives artists unprecedented control over their creative workflow. Start with immersive, full-scale creativity in VR — then perfect your craft with surgical precision on desktop.
👉 Experience this flexible sculpting workflow for yourself with the Adobe Substance 3D Collection free trial and revolutionize how you create in 3D.
